ChromaTek 19mm Momentary Push Button with Full-Color RGB (WS2812) LED
This push button from ChromaTek is different from standard momentary buttons because it has an addressable RGB LED built in (using a WS2812 LED). That means, with a microcontroller (like an Arduino) and some programming, you can control the color, brightness, and effects like blinking or fading.[Amazon Link]

Specifications:
- Type: Push Button (Momentary)
- Current Rating: 5 Amps
- Operating Voltage: 5V DC
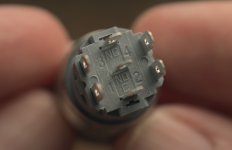
- Connector Type: Clamp (with included wire harness) NOTE: Make sure it is inserted properly!
- Mounting: 19mm Panel Mount
- Material: Stainless Steel (IP65, water-resistant)
How It Works:
When you press the button, the "momentary" action connects the Normally Open (NO) terminal to Common (COM). This sends a signal to the microcontroller that the button is pressed. Releasing the button breaks the connection, switching it back to Normally Closed (NC).Addressable RGB LED:
The LED inside the button can display any color, thanks to the WS2812 RGB LED. It needs a PWM signal from a digital pin on the microcontroller. You can control the color and brightness by sending the right data. For reliable operation, especially with longer wires, it's recommended to use a 220-470Ω resistor on the Data In line to protect the signal. If you’re using multiple buttons, the Data Out pin lets you chain them together in series without needing extra connections.
Wiring Breakdown:
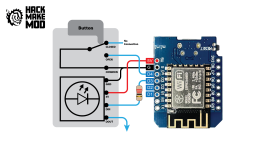
Here’s how to wire the button:- Normally Open (NO): Connect to a digital input pin on your microcontroller.
- Common (COM): Connect to ground.
- Power In (3.3V-5V): Powers the LED, no need for an external resistor.
- Data In: Connect to a digital output pin through a resistor (220-470Ω) on the microcontroller.
- Data Out: Use this to connect to the Data In of the next button if you want to chain multiple buttons together.

CAUTION: Be aware that the button's wire colors do not follow standard color codes, so double-check before wiring.

Use Cases:
- Status Indicator: In one setup, I used the button to change colors based on system status, synced with an OLED screen.
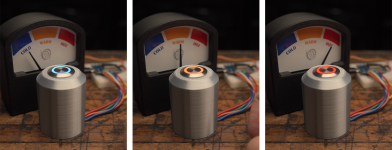
- Servo Control: In another project, I connected the button to a servo-driven needle gauge, cycling through different colors for different positions.

Summary:
This button is practical for projects that need feedback, like custom control panels or visual indicators. It’s easy to wire, especially with the built-in resistor for the LED, and the IP65 rating means it’s protected against dust and water.Sample Code:
This sketch uses a single NeoPixel LED and a button to control various lighting effects. Each time the button is pressed, the LED changes color or behavior based on the number of presses. It supports different effects such as solid colors, fading between colors, flashing, and a dissolve effect. The program demonstrates how to interact with the NeoPixel LED strip using button presses.
C++:
/*
 * Author: [URL='http://hackmakemod.com/']HackMakeMod.com[/URL]
 *
 * Description:
 * This sketch uses a single NeoPixel LED and a button to control various lighting effects.
 * Each time the button is pressed, the LED changes color or behavior based on the number of presses.
 * It supports different effects such as solid colors, fading between colors, flashing, and a dissolve effect.
 * The program demonstrates how to interact with the NeoPixel LED strip using button presses.
 *
 * Components used:
 *  - 1x NeoPixel LED
 *  - 1x Button
 *  - 1x ESP8266 or compatible microcontroller
 *
 * Wiring:
 *  - NeoPixel LED:
 *      - Data pin connected to D3
 *      - Power (VCC) connected to 3.3V or 5V
 *      - Ground connected to GND
 *  - Button:
 *      - One side connected to D4
 *      - Other side connected to GND
 *
 * Behavior:
 *  - When the button is pressed, the NeoPixel LED goes through various color modes and effects.
 *    The effects change based on the number of times the button has been pressed, resetting after 12 presses.
 */#include <Adafruit_NeoPixel.h>#define NUMPIXELS 1         // Number of LEDs in the strip
#define LED_PIN D3          // Pin where the NeoPixel LED is connected
#define BUTTON_PIN D4       // Pin where the button is connectedAdafruit_NeoPixel strip = Adafruit_NeoPixel(NUMPIXELS, LED_PIN, NEO_GRB + NEO_KHZ800);int buttonState = 0;           // Variable to store button state
int lastButtonState = HIGH;    // Variable to store last button state (HIGH because of INPUT_PULLUP)
int pressCount = 0;            // Counter to track button pressesvoid setup() {
  // Initialize NeoPixel strip
  strip.begin();
  strip.show(); // Initialize all pixels to 'off'  // Set the button pin as an input with pull-up resistor
  pinMode(BUTTON_PIN, INPUT_PULLUP);
}void loop() {
  int currentButtonState = digitalRead(BUTTON_PIN);  // Detect button press (when it goes from HIGH to LOW)
  if (currentButtonState == LOW && lastButtonState == HIGH) {
    pressCount++; // Increment the button press count    if (pressCount > 12) {
      pressCount = 1; // Reset press count after the 12th press
    }    // Run the corresponding action based on the press count
    runLEDSequence(pressCount);    // Debounce: wait until the button is released to avoid repeated triggers
    while (digitalRead(BUTTON_PIN) == LOW) {
      delay(30); // Little delay for debounce purposes
    }
  }  lastButtonState = currentButtonState; // Update the last button state
  delay(10); // Short delay for stability
}// Function to control the LED based on button presses
void runLEDSequence(int pressCount) {
  switch (pressCount) {
    case 1:
      setColor(strip.Color(0, 255, 0));  // Green
      break;
    case 2:
      setColor(strip.Color(255, 0, 0));  // Red
      break;
    case 3:
      setColor(strip.Color(0, 0, 0));    // LED OFF
      delay (100);
      setColor(strip.Color(0, 255, 0));  // Green
      break;
    case 4:
      setColor(strip.Color(0, 0, 0));    // LED OFF
      delay (100);
      setColor(strip.Color(255, 0, 0));  // Red
      break;
    case 5:
      setColor(strip.Color(0, 0, 0));    // LED OFF
      delay (100);
      dissolveThroughColors();           // Dissolve through 6 colors in 2 seconds
      break;
    case 6:
      setColor(strip.Color(0, 0, 0));    // LED OFF
      break;
    case 7:
      setColor(strip.Color(255, 255, 255));  // White
      break;
    case 8:
      fadeToColor(strip.Color(0, 20, 0)); // Fade to Dim Green
      break;
    case 9:
      fadeToColor(strip.Color(255, 0, 0));   // Fade to Red
      break;
    case 10:
      setColor(strip.Color(140, 20, 50));    // Custom Color
      break;
    case 11:
      flashColor(strip.Color(255, 0, 0), 250); // Flash Red
      break;
    case 12:
      setColor(strip.Color(255, 255, 255));  // White
      break;
    case 13:
      setColor(strip.Color(0, 0, 0));        // LED OFF
      break;
  }
}// Function to set a solid color on the NeoPixel LED
void setColor(uint32_t color) {
  strip.setPixelColor(0, color);
  strip.show(); // Send the updated color to the hardware.
}// Function to dissolve through 6 colors in 2 seconds with smooth fades
void dissolveThroughColors() {
  uint32_t colors[6] = {
    strip.Color(255, 0, 0),   // Red
    strip.Color(255, 165, 0), // Orange
    strip.Color(255, 255, 0), // Yellow
    strip.Color(0, 255, 0),   // Green
    strip.Color(0, 0, 255),   // Blue
    strip.Color(75, 0, 130)   // Indigo
  };  int transitionSteps = 50;  // Number of steps to fade between colors
  int transitionTime = 2000 / (6 * transitionSteps);  // Time for each step, spread across 2 seconds  for (int i = 0; i < 5; i++) {
    fadeBetweenColors(colors[i], colors[i + 1], transitionSteps, transitionTime);
  }  // Finally fade from Indigo back to Red
  fadeBetweenColors(colors[5], colors[0], transitionSteps, transitionTime);
}// Function to smoothly fade between two colors over a given number of steps
void fadeBetweenColors(uint32_t color1, uint32_t color2, int steps, int stepDelay) {
  for (int i = 0; i <= steps; i++) {
    uint8_t r = (uint8_t)((getRed(color1) * (steps - i) + getRed(color2) * i) / steps);
    uint8_t g = (uint8_t)((getGreen(color1) * (steps - i) + getGreen(color2) * i) / steps);
    uint8_t b = (uint8_t)((getBlue(color1) * (steps - i) + getBlue(color2) * i) / steps);    setColor(strip.Color(r, g, b));
    delay(stepDelay);  // Control the speed of the fade
  }
}// Function to fade from the current color to a target color
void fadeToColor(uint32_t targetColor) {
  uint32_t currentColor = strip.getPixelColor(0);  for (int i = 0; i <= 255; i++) {
    uint8_t r = (uint8_t)((getRed(currentColor) * (255 - i) + getRed(targetColor) * i) / 255);
    uint8_t g = (uint8_t)((getGreen(currentColor) * (255 - i) + getGreen(targetColor) * i) / 255);
    uint8_t b = (uint8_t)((getBlue(currentColor) * (255 - i) + getBlue(targetColor) * i) / 255);    setColor(strip.Color(r, g, b));
    delay(2);  // Control the fade speed
  }
}// Function to flash a color at a given interval (in ms)
void flashColor(uint32_t color, int interval) {
  for (int i = 0; i < 6; i++) {  // Flash 6 times
    setColor(color);
    delay(interval / 2);
    setColor(strip.Color(0, 0, 0));  // Turn off
    delay(interval / 2);
  }
}// Utility functions to extract R, G, B from a 32-bit color
uint8_t getRed(uint32_t color) {
  return (color >> 16) & 0xFF;
}uint8_t getGreen(uint32_t color) {
  return (color >> 8) & 0xFF;
}uint8_t getBlue(uint32_t color) {
  return color & 0xFF;
}
Attachments
Last edited:

